
AirPro Deluxe Pond Aeration Systems
Learn more-
AirPro Deluxe Pond Aerator Kit - 1/2 to 1 Acre Ponds
Regular price $1,79909Sale price $1,79909 Regular priceUnit price per$1,99899Sale -
AirPro Deluxe Pond Aerator Kit - up to 2 Acre Ponds
Regular price $2,41559Sale price $2,41559 Regular priceUnit price per$2,68399Sale -
AirPro Deluxe Pond Aerator Kit - up to 3 Acre Ponds
Regular price $2,73239Sale price $2,73239 Regular priceUnit price per$3,03599Sale -
AirPro 3/4 HP Rocking Piston Pond Aerator Kit - up to 4 Acre Ponds
Regular price $3,65309Sale price $3,65309 Regular priceUnit price per$4,05899Sale -
AirPro 3/4 HP Rotary Vane Pond Aerator Kit - up to 6 Acre Ponds
Regular price $4,23179Sale price $4,23179 Regular priceUnit price per$4,70199Sale -
AirPro Deluxe 1 HP Gast Rotary Vane Aerator Kit - 3 to 9 Acres
Regular price $5,34059Sale price $5,34059 Regular priceUnit price per$5,93399Sale -
2HP High Pressure Rocking Piston 6 Diffuser Aeration System
Regular price $7,79999Sale price $7,79999 Regular priceUnit price per$7,99999Sale -
2HP High Pressure Rocking Piston 10 Diffuser Aeration System
Regular price $8,21999Sale price $8,21999 Regular priceUnit price per$8,69999Sale -
AirPro 1/4 HP Rotary Vane Pond Aerator Kit - 1 to 2 Acre Ponds
Regular price $2,76119Sale price $2,76119 Regular priceUnit price per$3,06799Sale


Collection: AirPro Deluxe Pond Aeration Systems
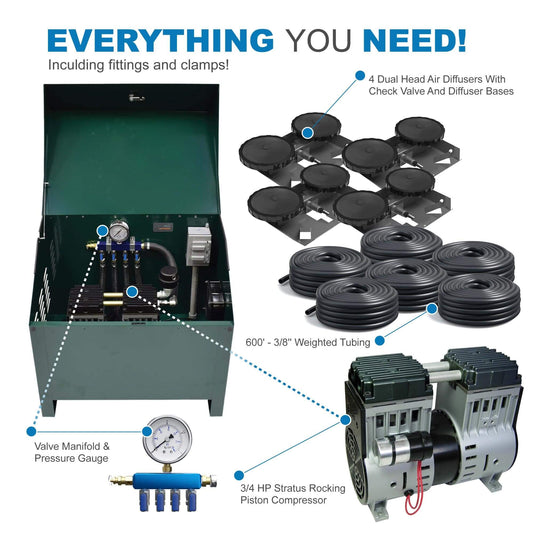
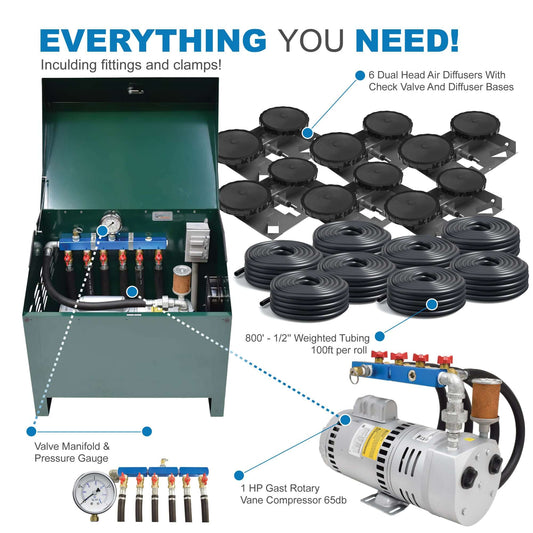
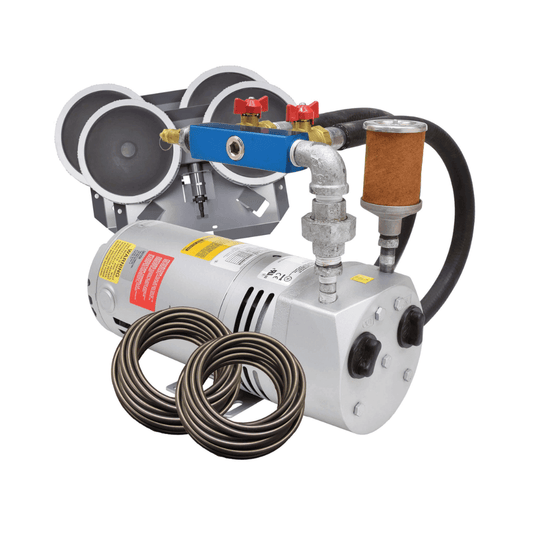
Above are our Deluxe Airpro Pond Aeration Kits. Diffused aeration systems are the best way to aerate, destratify and create circulation on ponds over 6' deep. We recommend the Airpro Deluxe system over our standard kits because they include a lockable steel cabinet to protect your compressor. If you already have a safe, dry place for your compressor you can opt to purchase these units without the cabinets.
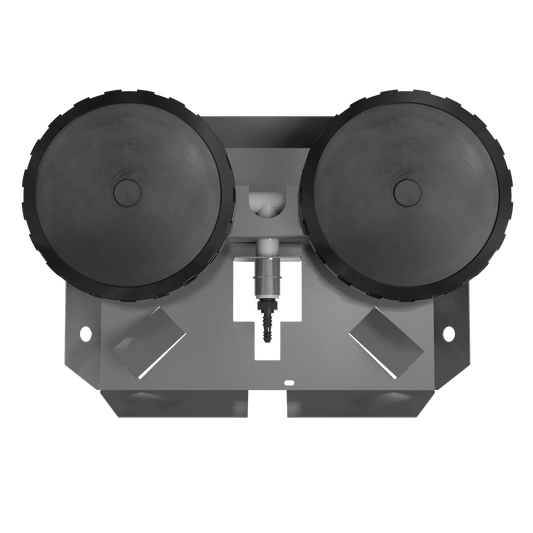
Each system has three basic parts.
1. an air compressor
2. an air hose
3. an air diffuser
4. compressor cabinet
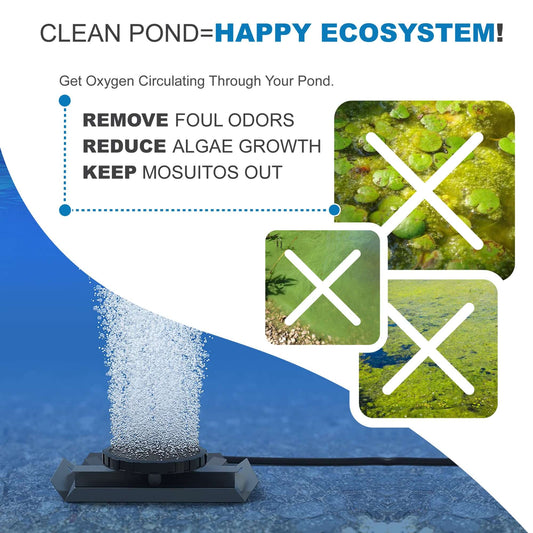
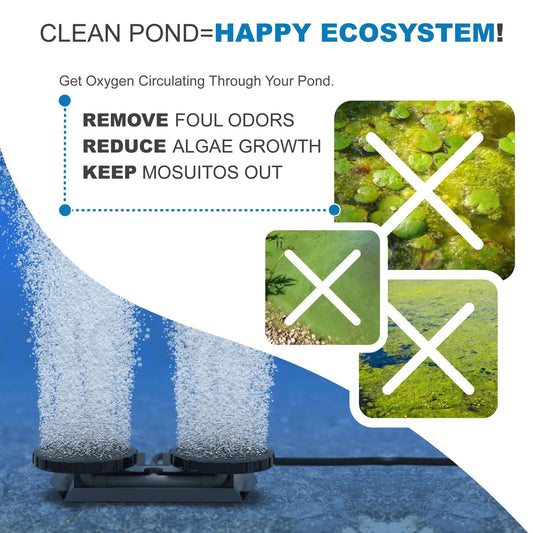
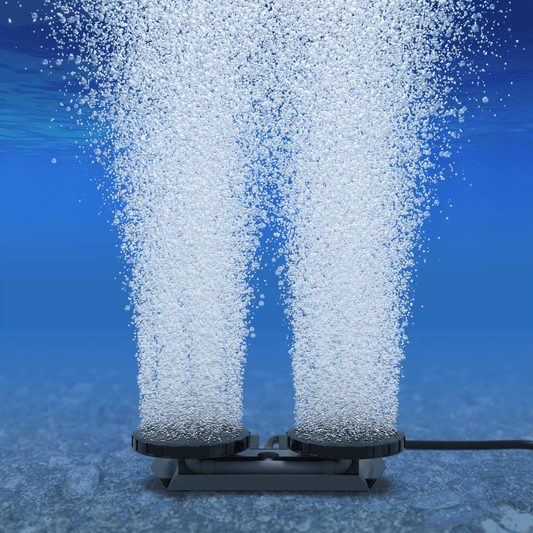
The air compressor sits on shore and pumps air out through the hose to the air diffuser located on the bottom of the pond. The result is thousands of tiny bubbles rushing out of the diffuser to the pond surface, creating circulation and providing aeration.
There are several advantages to using diffused aeration kits instead of surface aerator:
1. Electric motor is on shore, not in the water,
2. Air diffusers lay on the bottom, ensuring aeration of entire pond from bottom to top, regardless of depth size,
3. With proper sizing, tubing lengths up to 2000' can be achieved for ponds without electricity nearby.
All motors are designed for continuous duty operation and are oil-less for low maintenance. Periodic cleaning of air filter and replacement of diaphragm and gasket every 4 to 5 years is all that is necessary. The rubber membrane diffusers are self cleaning and never really need maintenance, you just leave them in the bottom of your pond for years of service. We can build much larger systems or alter these kits to fit you specific needs. Please call for assistance. All of our kits come with weighted airline and we highly recommend not trying to use any other type of tubing due to the buoyancy of non-weighted tubing.
Fountains vs. Diffused Aeration - Which is Better?
Fountains are a popular choice when decorative aerator is desired. Fountains splash the surface of the pond and help control surface algae and duckweed, but do not aerate down to the bottom of deep ponds. We do recommend surface or fountain aerators in ponds that have a maximum depth of 5' or less. Ponds deeper than 5' will always fair better with a diffused system that sits on the bottom and aerates the entire water column up towards the surface.
Pond Aerator - Installation Instructions
Below we are providing you an illustrated guide on how to properly install an aeration system. Obviously this is a basic overview and is not designed to be a comprehensive overview. As you can see installing our systems is not overly complex and can be easily installed by the average do-it-yourselfer. Otherwise if you do not have the time or desire to install an aeration system yourself, many of our customers have had lots of luck hiring independent landscapers, electricians and plumbers to install these units for a reasonable price.
Step 1 - Unpack your aeration system and if you see that any parts are pieces are missing please notify us.

Step 2 - After unpacking you willl want to start by assembling the diffuser. Find this barbed check valve and determine if your aerator has 3/8'' or 1/2'' tubing. If you have 3/8'' tubing then you can leave the barb as it is. If you have 1/2'' tubing you can remove the tip of the barb fitting at the line illustrated in this image.

Step 3 - Find one of the included hose clamps and slip it over the barbed check valve fitting pictured above. Then push the tubing tightly on to the barbed fitting and tighten the hose clamp.

Step 4 - Utilizing washers on both sides of the base insert provided bolt and tighten the nut, this clamp will provide strain relief for the tubing.

Step 5 - The base of your diffuser is self weighted, unlike the older styles of diffuser bases on the market you do not have to fill up with sand or gravel, it is heavy enough to sink down to the bottom on its own. There is a female threaded hole on the top of the base identify the side where that is located.
Step 6 - You will screw the diffuser head into the base, hand tight. Do not use tools or over tighten as this could break the fitting.

Step 7 - Now that your diffuser is assembled and ready, you can now get the tubing or airline and unroll the entire roll.

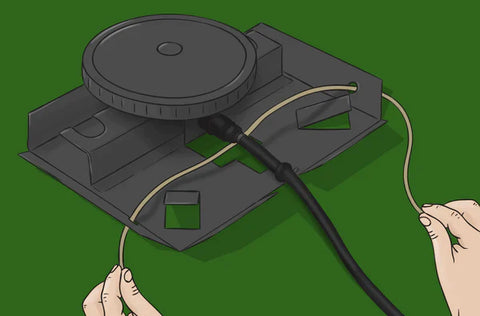
Step 8 - Loop a rope through the pre fabricated holes on the base as shown. You want to loop it so that both sides of the rope are in your hands and when the diffuser hits the bottom of the pond you will be able to let go of one end and pull the entire rope up.
Note: If you ever think you would want to move the diffuser in the future then it is recommended to leave the rope attached and tie it to something like a milk jug, duck decoy, really anything that floats, so that at a later time you can locate the rope and pull up the diffuser. Pulling up the diffuser from the airline can result in breakage of the fittings.
Step 9 - Begin to lower the diffuser to the bottom of the pond, be sure to put most of the weight on the nylon rope and not on the tubing.

Step 10 - Once the diffuser is on the bottom of the pond you can release one end of the rope and pull on the other side until the rope is out of the water. If you have opted to tie it to a float as noted in step 8, obviously you would skip this step.

Step 11 - If your aeration system has more then one diffuser then you will install the valved outlet assembly. This valve system will allow you to control the airflow to each diffuser.
Step 12 - Once the valved outlet is installed you can now connect the other end of the airline to the compressor. The same applies if you have a system with just 1 diffuser.
Step 13 - If you have any tubing exposed over land then you may want to dig a trench and bury it to protect others from tripping over it or to protect from being cut by lawnmower blades.

Step 14 - We highly recommend our deluxe version aeration systems which include a fan cooled steel cabinet to protect your compressor from the elements. If the compressor gets wet it can ruin the motor. The alternative option is our standard pond aeration system, you would need to build your own enclosure our utilize a pump shed or covering you currently have near your pond.

This is the basic instructions on how to properly install an aerator, as you can see there is nothing especially difficult. If you ever have any questions or need more information feel free to call and speak with one of our experts at 1-888-775-2402.
NOT SURE WHAT AERATOR YOU NEED?
Let us Help!